How to add learn more button on Facebook post
Facebook has long been an ideal platform for promoting brands, developing businesses and reaching customers effectively. To attract more customers to use your products, paying attention to the action buttons on the post is important. These buttons will help customers easily connect and contact your landing page quickly and conveniently. Let’s learn about how to add learn more button on facebook post with RentFB!
How to add learn more button on Facebook post
To add a call-to-action button to your ad in Facebook Ads Manager, you can follow these detailed steps:
Step 1: Log in to your Facebook account and go to Ads Manager.
Step 2: Click the “Create” button to start creating a new ad campaign.
Step 3: Select a campaign objective that matches your advertising goals and click “Continue”. Campaign objectives can be:
- Awareness level
- Traffic
- Engagement (especially if you want to use existing posts for ads)
- Potential customers
- Sales
Note: If you want to use an existing post for your ad, select the “Traffic,” “Awareness,” or “Engagement” objective as the conversion location and post engagement or video views.
Step 4: Next, you’ll need to select your ad’s audience, placements, budget, and schedule. Once done, click “Next.”
Step 5: Select the Facebook Page and Instagram account you want to promote your campaign to. This will allow your ad to be shown on those platforms.
Step 6: Choose the appropriate ad format, such as image, video, or carousel. Note that “Instant Experience” doesn’t support call-to-action buttons.
Step 7: Upload an image or video for your ad and add compelling text content.
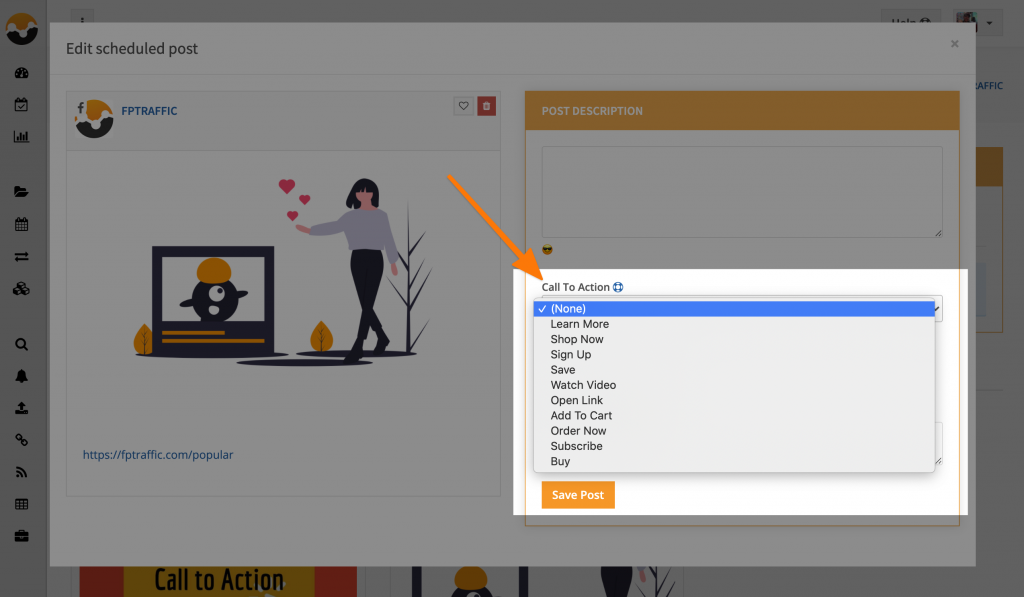
Step 8: In the “Call to Action” section, select an option from the drop-down menu. This is important, as your call-to-action button will help users take the action you want them to take, like “Shop Now,” “Sign Up,” “Learn More,” etc. You can also preview this button in your ad.
Step 9: Once you’ve completed the above steps, click “Publish” to finish creating your ad. Your ad will start running, and people who see it will be able to click or tap on your call-to-action button to take the action you want.
That’s it, you’re done adding a call-to-action button to your ad in Facebook Ads Manager.
Some important notes when adding a call-to-action button to your ad
When adding a learn more button to a Facebook post, keep the following in mind:
List of call-to-action buttons depending on campaign goals
When you create an ad, your call-to-action button options will vary based on the campaign objective you choose. To understand which buttons are available for each ad format, refer to the Facebook Ads Guide.
Cannot add call-to-action button when using Instant Experience
If you choose to add an Instant Experience to your ad, you won’t be able to add a call-to-action button. Instant Experiences are optimized for mobile and open automatically when a user views the ad in their feed. Therefore, they don’t support adding a call-to-action button and won’t display on desktop.
Add a destination when the goal is awareness
If your ad objective is awareness, click Add destination in settings and select “Website”. This will open a drop-down menu for you to choose the appropriate call-to-action button.
Use the “Donate Now” button for charity
If you want to use the Donate Now button as your call to action, you’ll first need to register your charity with Facebook payments.
Ads with “Donate Now” button on Instagram Stories
- The Donate Now button can be used as a call-to-action for Instagram Stories ads if your page is classified as a nonprofit. This applies to all countries where users create ads.
- However, if your ad is created in Instagram Stories in the US, you’ll only be able to use the Donate button once your page is classified as a nonprofit.
These tips will help you use call-to-action buttons more effectively in your advertising campaigns, increase engagement, and direct users to take the specific actions you want them to take.
How to Add a Call to Action Button to a New Facebook Page
To optimize the user experience and encourage actions like booking an appointment, purchasing a product, or contacting directly, you can add a call-to-action (CTA) button to your Facebook Page. Here are the detailed steps to add a call-to-action button to a new Facebook Page:
- Step 1: Log in to your Facebook account. Make sure you have administrative rights to the Facebook Page you want to add the action button to.
- Step 2: After logging in, click on your avatar in the top right corner of the screen to open the menu.
- Step 3: Select View all profiles from the drop-down menu.
- Step 4: Select the Facebook Page you want to manage and move on to continue adding a call-to-action button.
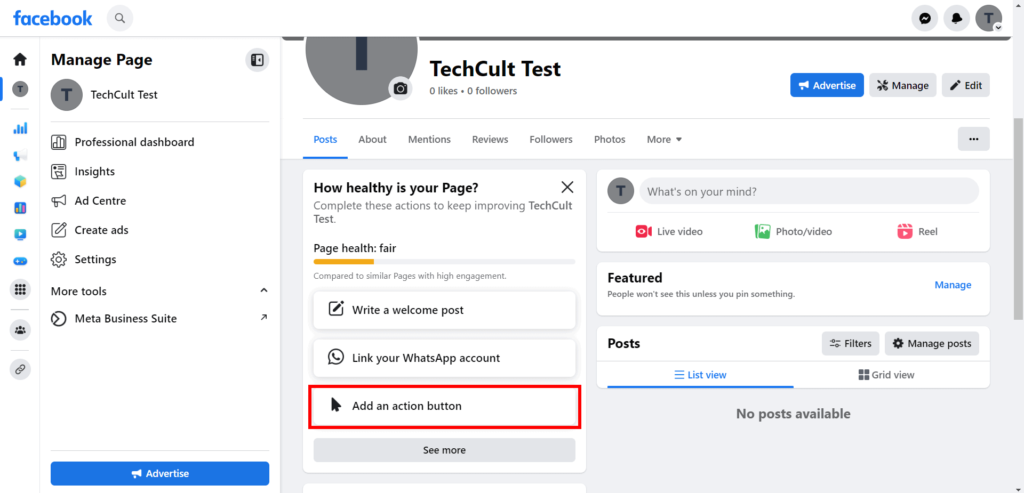
- Step 5: Once you are on your Facebook Page, find and click on Pages in the left menu of the Facebook interface. This will take you to the Page management area.
- Step 6: On your Page, you’ll see the area in the bottom right corner of your cover photo where your action button (if you have one) is usually located.
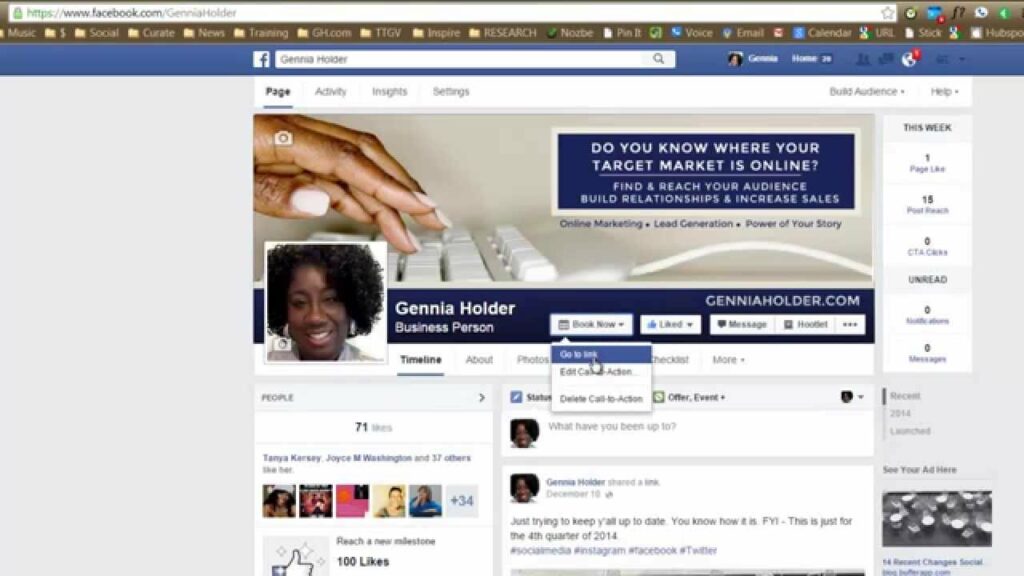
- Step 7: Click this button. If you don’t have an action button yet, click Add Action Button to add a new one. If you want to edit an existing button, click Edit Action Button.
- Step 8: After clicking Add Action Button or Edit Action Button, a window will appear with call-to-action button options. Depending on your purpose, you can choose one of the button types like “Book Appointment”, “Buy Now”, “Contact Now”, “Send Message”, etc.
- Step 9: Select the button that matches your Facebook Page’s goal, then click Next.
- Step 10: Depending on the action button you choose, you will be prompted to enter relevant information such as website link, phone number, messaging app, etc. Follow the on-screen instructions to complete the action button setup.
- Step 11: After filling in all the information, click Save to confirm the changes. Your call-to-action button will immediately appear on your Facebook Page.
Note:
- If your Page already has Appointments set up, you can add a “Book Now” button to make it easier for customers to schedule appointments. However, this feature is only available for traditional Facebook Pages before the transition to the new Page experience.
With these simple steps, you have successfully added an action button to your Facebook Page. This is an effective way to drive engagement and direct users to take important actions, such as shopping or signing up for a service. Good luck with making the most of this feature!
Contact Info
You need a Facebook advertising account but don’t know any reputable provider. Coming to
Rentfb is where you will experience what you need crypto facebook ads prestige, high trust, and professional consulting and service support for customers.
Frequently Asked Questions
How to Edit a Call to Action Button on a Post
Editing the call to action (CTA) button on a post helps you optimize the effectiveness of your Facebook ad or post. To do this, simply go to the post containing the action button, click the three dots icon in the top right corner of the post, then select Edit Post. Here, you can change the type of action button, edit the link or related content according to the campaign objective. Once finished, click Save to update the changes. This is a simple but effective way to increase engagement and guide users to the desired actions.
There are a few main reasons why you may not be able to add a “Send Message” button to your Facebook post. First, this feature is often limited by the post type or ad campaign objective you’ve selected. If your post doesn’t meet Facebook’s formatting requirements or isn’t part of a campaign with an engagement or messaging objective, the “Send Message” button won’t be available. Additionally, your Facebook ad account or Page may not have fully set up messaging or may have access issues. To fix this, you’ll need to check your Page settings, make sure messaging is enabled, and select the correct campaign objective that supports the “Send Message” button.

