How to create a place in facebook

Facebook is not only a social network that connects people together, but it is also a powerful tool to support business activities and build brands. By creating a location on Facebook, businesses can take their marketing activities to the local level and promote their Facebook page for free. It allows businesses to connect and interact with customers in their area. Moreover, when creating a location and adding it to a post on the business’s Facebook page, users can easily search for related posts in their area, helping to attract customers’ attention quickly. In this article, Rentfb will share with you how to create a place in facebook!
What is the purpose of creating a place on Facebook?
Creating and adding locations to your Facebook posts increases visibility, connects your business to a local audience, and provides context to your content. This makes your posts more relevant and engaging to your Facebook followers. Here are some reasons why businesses should create locations on Facebook:
Enhance brand awareness
Creating a location and adding it to your business’s Facebook page will increase your chances of appearing on a user’s digital map. Because when customers search for a location near them associated with your brand, your business’s activities help increase brand awareness. This is very useful for local businesses: restaurants, cafes, retail stores, etc. or other services that want to increase their online presence to be known by more people.
Create connections and promote engagement
Customers can check in to a location on Facebook or leave a review and share their experience there. By creating a location on Facebook, businesses can create a natural connection and interaction with customers and the brand. Positive reviews from customers not only increase the level of credibility but also attract more potential customers. By tagging your location in your content, people in the area can easily discover and interact with your posts. Furthermore, you can target based on location, allowing businesses to reach potential customers in a specific area, attract them to the physical location and improve their online presence.
Increase professionalism and credibility with customers
A location created and verified on Facebook will create more professionalism and trust in the eyes of customers. This is very important for new businesses or businesses that are building their brand in the market. When a business has built trust with customers, it will increase interaction and promote conversion. Especially if the business provides a great experience of products and services for customers. Creating a location and adding it to a Facebook post or page will encourage customers to visit the business’s store. When customers see your physical location, they can find the business as well as define their needs and have the ability to interact. The posts of customers checking in and interacting at your business location on Facebook are like an advertisement for your brand, products and services to a wider audience.
Improve local SEO
Creating a location on Facebook not only helps increase the online presence of the business, supporting business activities and sales, but it also has an impact on local SEO. Because when users search for information about a product or service on Google or other tools, the business’s location information will be displayed. This helps increase brand awareness and helps businesses reach and attract potential customers.
Effective information management and marketing strategy support
When creating a location on Facebook, businesses can easily control and update information including address, opening hours, phone number and products and services provided. Through regular management and updating, customers will always have the most accurate and complete information about the business. In addition, Facebook has a location-targeted advertising tool. By creating and verifying a location on Facebook, businesses can run ads targeting audiences in a specific area, optimizing their budget effectively.
How to create a place in facebook
To create a location on Facebook, you can create a Facebook page for your business and add a location, or you can also add the location to photos and posts.
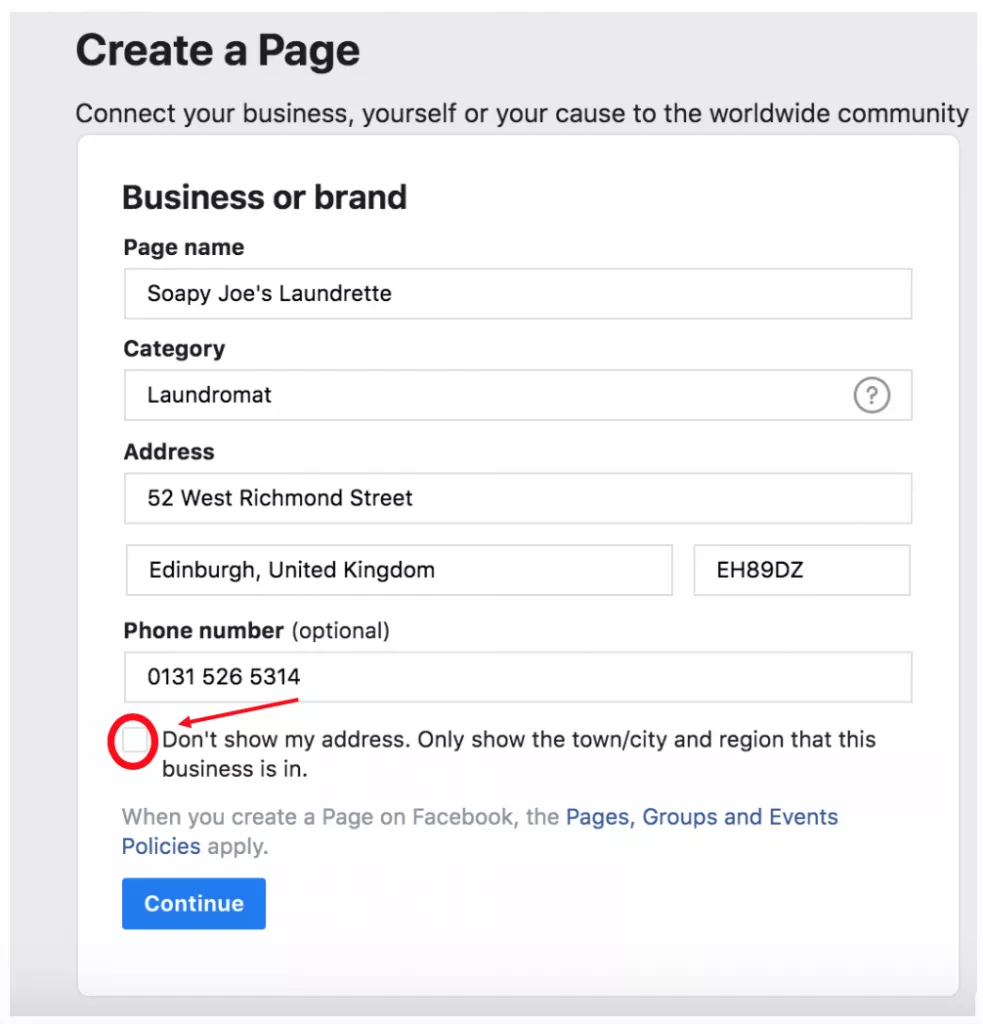
First, you need to create a Facebook business page. Once you have a page, log in to your Facebook account and go to your business page. Go to Facebook Business Manager. Make sure you have editor or admin access to the Facebook page you want to add a location to. You can check this by going to Settings and selecting Page Roles.
Once you are logged into Business Manager, go to your Properties and select Business Locations. If you have multiple Facebook pages, select the page you want to add a location to from the drop-down menu and click the Get Started button. If you have an address on your Facebook page, your first location page will be created from that address if you select that option. While you have three options for creating a location page on Facebook, just click the green Add Location button to get started.
You can add more locations by manually entering them, but this is only really useful if your business has less than 10 locations. For businesses with multiple locations, it is simpler and quicker to upload a CSV file containing different locations. This CSV file should follow the template provided by Facebook to ensure a seamless bulk upload. An existing page can be imported as a location page if the business has created separate pages for different locations. You can use these options to import into your Locations Manager for easier management.
When you want to add a location to a photo on Facebook in the case of posting a photo and tagging the location so that viewers know where the photo was taken. To add a location to a photo, log in to your Facebook account and navigate to the photo. Then click on the 3 dots and go to Edit Location. Next, search for the location you want to tag in the Facebook photo and click on the image. That’s it, you have completed adding a location to a photo on Facebook.
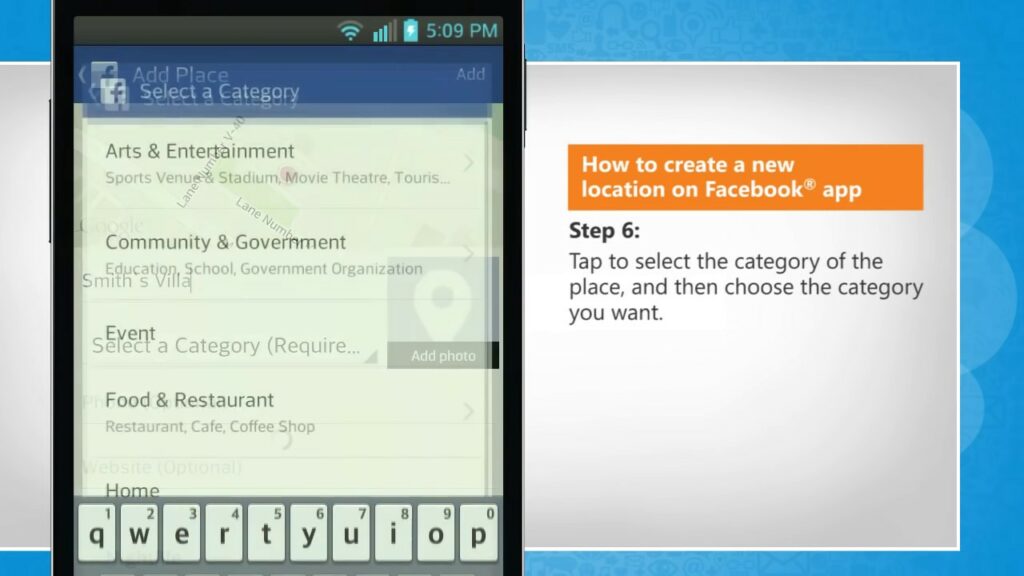
If you want to add a location to your Facebook post to increase visibility or help people know where your business is, first log in to your Facebook account, create a post, and click the Check in button. Now enter your location name or select a suggested location. If your location does not appear, create a location on Facebook by entering it manually. If you want to add a location to a post after it has been published, go to the post, click the 3 dots in the right corner, and then go to Edit Post. Next, go to Subscriptions and search for your location. Select your location and click Save.
Local promotion on Facebook is chosen by many businesses, especially those with physical stores: restaurants, hotels, gyms, etc. By creating a location on Facebook, businesses will increase brand awareness, reach local customers, increase interaction and encourage customers to visit the store.
Contact Info
Are you in need of Facebook advertising or need to rent a quality Facebook advertising account? Don’t worry! Rentfb is a unit specializing in providing reputable Facebook accounts, as well as direct advertising support. Provides all types of advertising accounts such as casino ads on facebook to help you reach and create fast conversions.
Frequently Asked Questions
The answer is yes. You should pay attention to your privacy settings when adding locations to posts. Facebook offers options to control who can see your location-tagged posts. Share your location-tagged posts with the public, your friends, a specific custom list, or just you. Adjusting these settings ensures you maintain control over who has access to your location information.
If you want to add a location to an existing post on your computer, go to your Facebook account. Then click on your profile picture in the top right corner and select your name to go to your personal page. Now scroll down to the post you want to add a location to and click on the 3 dots in the top right corner of the post. Next, click on Edit post and select Check in or click on the 3 dots in the bottom right corner. Now click on Where are you? to search for a location or select a location from the list below and click Save.

