How to add Google AdSense to my WordPress website
If you are looking to make money online through your personal website, you are probably interested in placing ads to create a sustainable source of income. One of the most popular and effective methods is Google AdSense – an advertising platform used by millions of bloggers and businesses worldwide. In this article, RentAds will share in detail “How to add Google AdSense to my WordPress website”, covering everything from account registration and verification to ad display setup. With clear step-by-step guidance, you will realize that “How to add Google AdSense to my WordPress website” is not complicated at all and can even help you maximize revenue from your daily traffic.
Why should you integrate Google AdSense into WordPress?
When owning a WordPress website, besides sharing valuable content with readers, many people also want to turn their site into a stable source of income. Google AdSense is the top choice, as it not only generates advertising revenue but also helps you optimize the user experience.
Create a sustainable passive income stream
One of the most important reasons to integrate Google AdSense into WordPress is its ability to generate passive income. When ads are displayed on your website, you can earn money each time a user clicks (CPC) or when ads reach a certain number of impressions (CPM). This is especially useful for those who run personal blogs, news websites, or knowledge-sharing platforms, as the higher the traffic, the more stable the income becomes.
Optimize the user experience
Google AdSense uses technology that analyzes user behavior and interests to display the most relevant ads. As a result, visitors see advertisements that match their actual needs instead of being disturbed by unrelated content. This not only helps increase the click-through rate (CTR) but also enhances the overall experience on the website.
Easy to integrate and manage on WordPress
WordPress is well known as a user-friendly platform, and Google AdSense is also designed for easy integration. You can quickly set it up through specialized plugins or manually insert the ad code into your website’s theme. In addition, Google provides detailed reporting tools to monitor ad performance, allowing you to make timely optimization decisions.
Enhance the credibility and value of the website
A website approved by Google to join AdSense means that it has met the basic standards of content and policy. This helps increase the site’s credibility while reinforcing its long-term value. If you are looking to build a personal brand or grow an online business, integrating AdSense into WordPress will be a strategic move.
How to add Google AdSense to my WordPress website
Integrating ads into WordPress is an important step if you want to optimize your website not only in terms of content but also profitability. With Google AdSense, you can easily turn daily traffic into a source of passive income while adding more value to your site. There are several ways to add Google AdSense to WordPress, ranging from using Google’s official plugin to manually inserting code. In this section, we will go through each method in detail so that you can choose the one that best suits your needs.
Add Google AdSense with specialized plugins
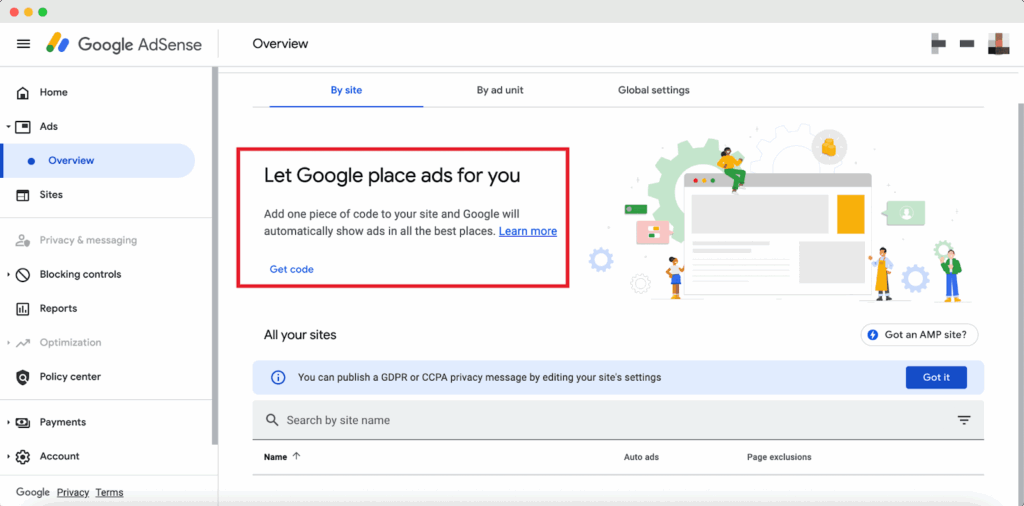
The simplest and most common way to integrate Google AdSense into WordPress is by using support plugins. Among them, Site Kit by Google is the official plugin developed by Google, allowing you to directly connect your AdSense account with your website. Once installed, you just need to log in to your Google account, grant access permissions, and the plugin will automatically synchronize advertising data. This is very convenient because you don’t have to manually handle HTML or CSS code.
In addition to Site Kit, other ad management plugins such as Advanced Ads or Ad Inserter are also reliable options. They allow you to customize ad placements, from the top of the page, within the content, down to the footer, or even in the sidebar. This way, you can easily control the user experience and optimize revenue. The advantage of using plugins lies in their intuitive interface, time-saving nature, and suitability for both beginners and experienced website administrators.
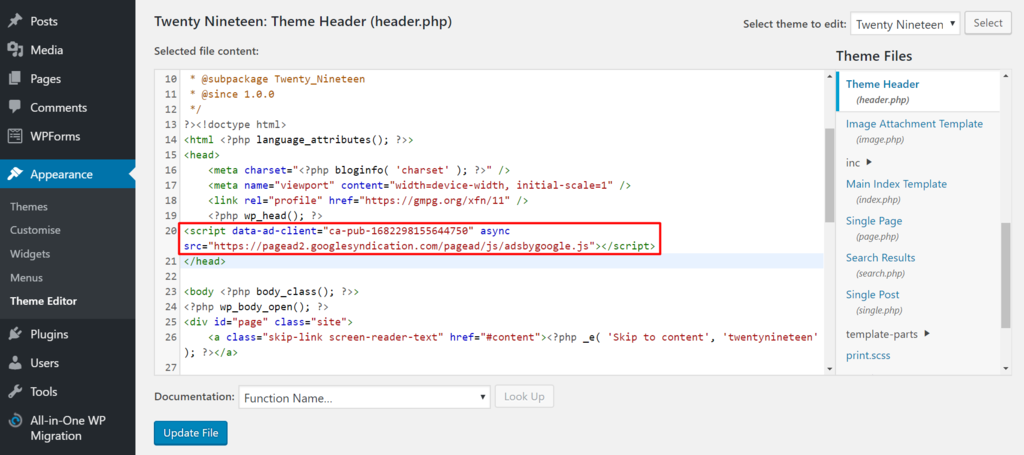
Manually Add Google AdSense Using Code
If you want full control and prefer not to rely on plugins, manually inserting the code is a solid option. Once your Google AdSense account is approved, you’ll receive an ad code snippet. All you need to do is copy this code and paste it into your WordPress site at the desired locations.
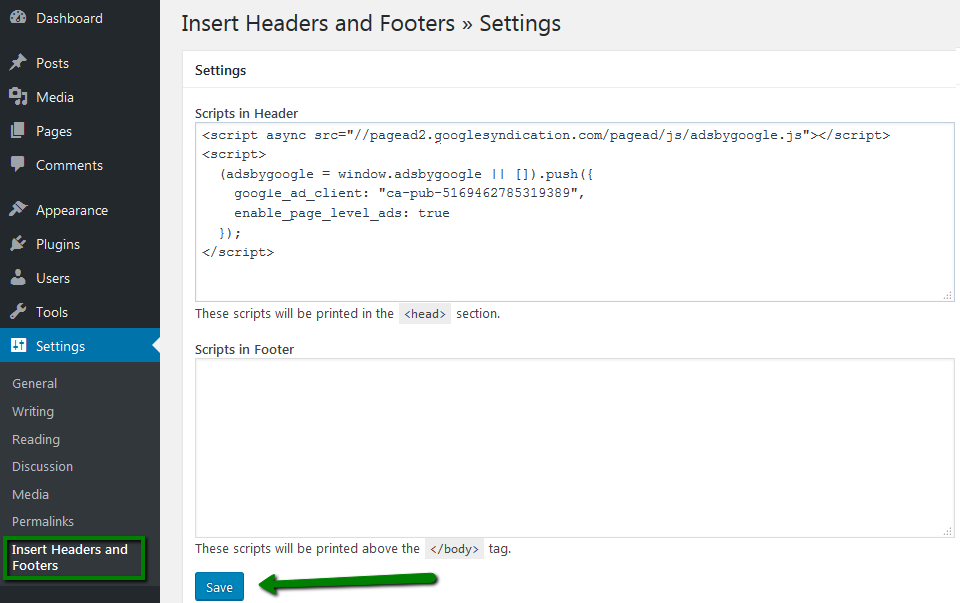
Typically, you can add the code to the header.php or footer.php file in your WordPress theme. Placing the code in the head section ensures that ads load simultaneously with the content, providing stable display. Additionally, you can use WordPress Widgets to paste the code into the sidebar or other widget areas.
However, this method requires some technical knowledge and careful handling, as even a small mistake in editing theme files can affect the entire website. Therefore, the manual approach is usually better suited for those familiar with coding or who want deeper customization compared to using plugins.
Integrate Google AdSense Through a WordPress Theme
Some premium WordPress themes are now designed with built-in sections dedicated to advertisements. This makes integrating Google AdSense much easier. You simply need to paste the ad code into the theme’s settings without having to edit code files or install additional plugins.
The advantage of this method lies in its stability and interface optimization, as the theme has predefined ad placements that do not interfere with the user experience. In addition, some themes also support responsive features, ensuring that ads display properly on both desktop and mobile devices.
However, not every theme comes with this option. Therefore, before purchasing or installing a theme, you should check whether it supports Google AdSense integration. If it does, this will be the quickest, most user-friendly, and time-saving method.
Some Common Errors After Adding Google AdSense to WordPress
Integrating Google AdSense into WordPress doesn’t always go smoothly. Many beginners often face issues such as ads not displaying, their websites being rejected, or other technical errors that interrupt the monetization process.
Ads Not Displaying
One of the most common issues when adding Google AdSense to WordPress is that ads do not display on the website, even if the code has been correctly placed. The causes can stem from several factors. First, Google usually requires a period of a few hours to 24 hours to crawl and verify the ads after you add the code. Therefore, if you have just set it up, you need to be patient and wait.
Additionally, this issue can occur if your website lacks sufficient content, violates policies, or has errors in code insertion. For example, you might place the code in a location that doesn’t support JavaScript or accidentally modify the code incorrectly. Some security or performance optimization plugins can also block ad display. Therefore, if ads are not showing, you should carefully check the code, its placement, and temporarily disable related plugins to test.
Website Rejected by Google AdSense
Being rejected by Google when applying for AdSense is often due to the website not fully meeting content and quality requirements. Google requires the site to have original articles, valuable content for readers, a clear layout, and no copyright violations. A website that is too new, lacks stable traffic, or contains sensitive or spammy content can also cause the application to be denied. In some cases, mismatched account information or a website with a poor user-friendly interface can also prevent approval.
To avoid rejection, you should prepare carefully before submitting your application. Make sure your website has at least 15–20 high-quality articles with clear, original content that meets user needs. At the same time, create an About page, Privacy Policy, and Contact page to enhance credibility in Google’s eyes.
How to Fix Common Errors
When encountering errors related to Google AdSense, the most important thing is to calmly analyze the cause and address it step by step. In the case of ads not displaying, check the code to ensure it is correctly inserted in the theme or plugin. If more than 24 hours have passed and the ads still do not appear, try enabling the test mode in your AdSense account to see if Google has recognized your website.
In the case of rejection, take the time to optimize your website before resubmitting your application. Add more high-quality content, remove any policy-violating elements, and optimize the site’s speed and layout. You should also check whether your website has been indexed by Google, as this indicates that your site is functioning properly and has real value.
Additionally, other issues such as slow ad display, poorly allocated ad placements, or low revenue may also occur during use. The solution for these problems usually involves optimizing ad placement, monitoring performance through Google Analytics, and avoiding excessive banners to prevent negatively impacting the user experience.
Contact Info
Information about “How to add Google AdSense to my WordPress website” hopes to provide you with additional necessary knowledge. At Rentads, there is a team of highly qualified and experienced staff and experts who will provide google ads account for rent as well as support when you run Facebook ads. Contact us via phone number.
Frequently Asked Questions
Yes, but the impact is usually minimal. Google has optimized the ad code to reduce page load delays. To ensure speed, you can place ads in appropriate locations, enable lazy loading, or use plugins that help boost website performance.
You should spend at least 2–4 weeks optimizing your website before resubmitting. During this time, add more content, improve the layout, increase page load speed, and ensure that basic pages like About, Privacy Policy, and Contact are fully completed.

